An article from our house plans and design tips series.
How to read floor plans Part 2
In the previous article, Part 1, we discussed the basic elements of a house plan to help you understand how to read floor plans.
In this article will cover the remaining components of a floor plan so you will have a basic understanding on how to read floor plans.
The following components are required to complete a set of house plans ready for construction.
Cross sections
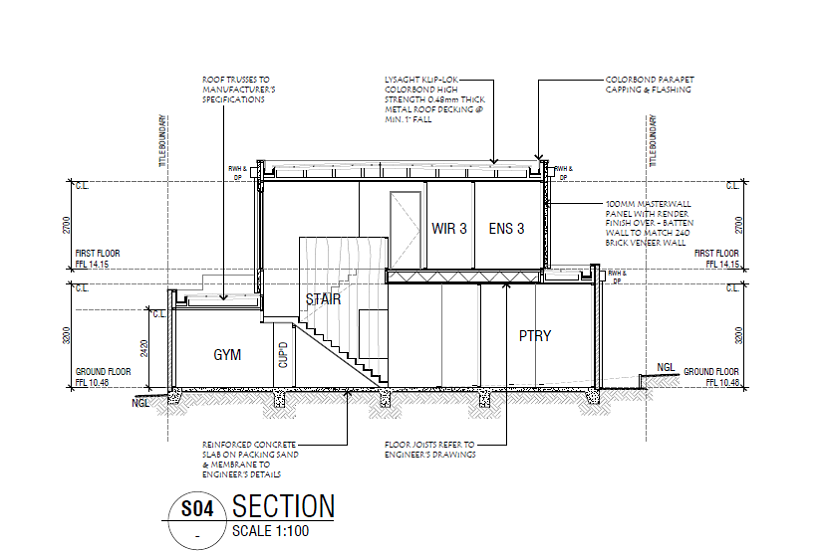
The cross section is one of the most important parts of house plans. A cross section represents a vertical plane cut through the plan, in the same way as a floor plan is a horizontal section viewed from the top. Imagine slicing your home in half vertically and looking through that section side on. This is what the cross section view does to give the builder a clear view of the relationship between different levels of a building.
All house plans have at least one cross section. A complex design could have multiple sections to show the builder clearly what may not be evident on the floor plan or the elevation.
In order to know which part of the house plans the section refers to there will be a line through the plan with an arrow pointing to the direction you will be looking at the section from and a number to signify the section if there is more than on section. See the image above as an example of a cross section.
Details on drawings
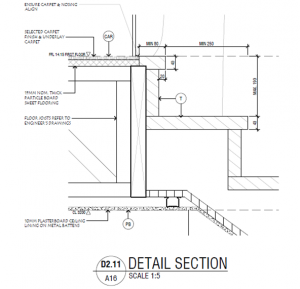
Detailed drawings show a small part of the construction at a larger scale to enable the builder to understand
what the designer wishes to achieve with a particular building element. All floor plans will have a sheet attached with standard details. These would cover construction methods for eaves, balconies and gutters as an example.
Where there is a specific architectural element the designer will draw a specific detail and possibly a section to show the builder how that components parts fit together. See the example to the left of a stair detail on a custom architect designed home.
Standard symbols used in floor plans.
1. DOORS: Doors are indicated on house plans with a line perpendicular to the wall and with a quarter circle, which shows the swing of the door. The perpendicular line is the side the door is hinged on.
A cavity slider or a pocket door is drawn as a door within a wall. You can determine which way it slides by the way its drawn.
The door may have a width and height. If it has a number on it, the number will correspond to a number on a door schedule.

A door schedule is an optional addition and normally detailed on more complex custom home designs and will detail the sizes, height and type of door.
In addition to the door schedule you may also have door elevations accompany the schedule.
2. SANITARY ITEMS: These symbols show the size and location of basins, sinks and toilets. Each component has a standard way of it being drawn, such as the shower on this plan.
3. JOINERY: This line shows the extent of the bench for the vanity. It’s the same for the kitchen and laundry. If there are overhead cupboards, they would be drawn as a dotted line.
Be aware that without detailed joinery drawings these only give the builder a general idea of size and location of the joinery to assist with wiring and plumbing.
Only detailed joinery plans with give the builder and the joiner a complete picture of is to be installed. Joinery plans will have plans, elevations and cross sections in the same way as house plans do. They will often also have the materials to be used noted on them.
4. WINDOWS: Windows are shown drawn within the walls on the floor plan and are indicated by three parallel lines. They may have the window size labelled on the window or a number.
A number will correspond to a number on the window schedule. Like the door schedule, the window schedule is an optional addition and normally detailed on more complex custom home designs.
The window schedule and will detail the sizes, height and type of window and glass to be used. In addition to the window schedule you may also have window elevations accompany the schedule which will detail any special features in the windows.
5. STAIRS: Stairs are drawn on the floor plans with an arrow showing the way up. Stairs are usually detailed in the cross section.
Stairs have to meet building code standards with minimum and maximum heights and widths for the tread and riser.
The stairs are usually labelled with a number which corresponds to a tread on the stair. The designer will use the building code to determine how many steps will fit in the space allocated on the floor plan and height of the ceilings.
6. INTERNAL WALLS: Internal walls are represented as 2 parallel lines on your floor plans. If they are insulated they will be hatched in the pattern for insulation.
7. EXTERNAL WALLS: The are numerous types of external walls used in house designs. These are are shown on the floor plans to show the builder what wall goes where. Typical wall types that you will see drawn on you floor plans are shown on the legend below.

Example of a wall legend on a floor plan
ELECTRICAL PLANS
Electrical plans are not required to build a home but are beneficial to ensure the correct number of lights and power points are allowed and positioned correctly in your home.
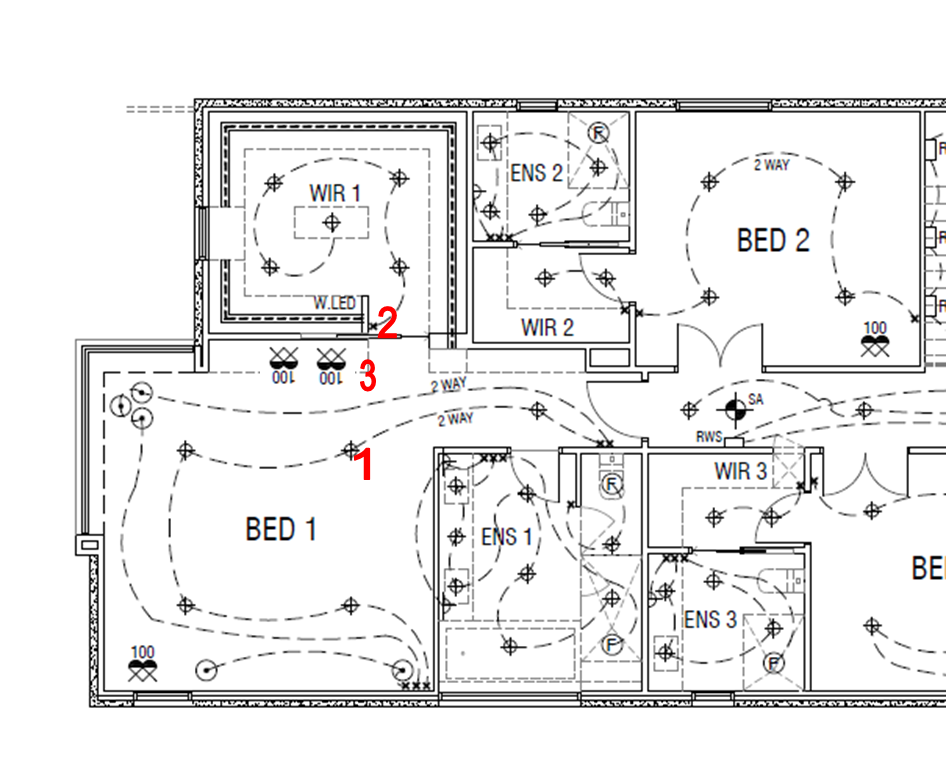
If your plans do not have an electrical plan your should consider getting one. There are standard symbols used in electrical plans. The dotted line represents the wire that connects the light to the switch. In the plan top the left No 1 is the light fitting, 2 the switch and 3 the power point.
An electrical plan always has a legend so the builder and electrician know what each symbol on the plan represents. Other items on the legend may be TV & Telephone points, exhaust fan and lighting types.

House plans need to be fully detailed to enable the builder to get a three dimensional image of what he needs to build. Each component of the plans plays an important part in providing information on what to build. It is always better to have more information rather than not enough. The more information supplied the less chance for variations, cost blow outs and disappointment on site.
New Home Plans & Design Tips
Part of our house plans and designs series.
This series of articles is designed to help you understand the importance of good plans and give you some tips in designing your new home. We hope you find this information useful in the design of your new home.
Renmark Homes – Building Custom Designed Homes in Melbourne’s North West
If you have any questions about how Renmark Homes can assist you in building your new home, please contact us on 1300 367 245, or visit our contact page for further options.


